
Engineered Hardwood Installation in Ontario, CA
Hardwood Floors Maple Ontario covers engineered hardwood for Ontario, CA homes — plank construction, the three ways it goes down over a concrete slab or a wood subfloor, the moisture test that comes before any glue, and the wear layer that decides how often it can be refinished.

 Illustration
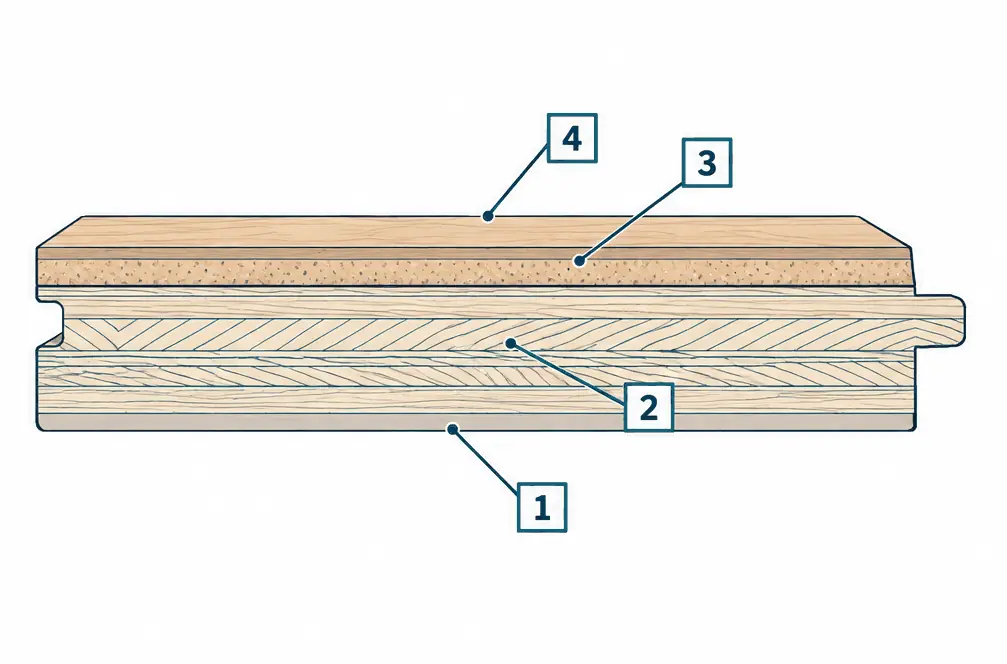
How an engineered plank is built
An engineered plank has a top layer of real wood, called the wear layer, glued over a core of cross-laid plywood or fiberboard, with a balancing layer underneath. The crossed layers pull against each other, which is why the plank moves less than solid wood when the air dries or gets damp.
- Wear layer. Real hardwood; its thickness, stated by the maker, sets how many sandings the floor has left.
- Core. Cross-laid plywood or fiberboard that keeps the board flat.
- Balancing backer. A layer on the underside that stops the plank from curling.
What the numbers show
- Backer A bottom layer that balances the top so the plank stays flat.
- Core Plies of plywood or fiberboard with alternating grain, which hold the plank steady as the air changes.
- Wear layer Real hardwood; its thickness decides how many light sandings the floor may take, so the maker's figure matters.
- Finish The factory coat on top, which wears first and is what a recoat refreshes.
Glue-down, floating or nail-down
| Method | How it goes down | Good fit | Watch for |
|---|---|---|---|
| Glue-down | Adhesive spread on the subfloor, planks pressed in | Slabs, a solid feel underfoot | Moisture reading must pass the maker's limit; messy cleanup |
| Floating | Planks lock or glue to each other over underlayment, not fixed to the subfloor | Condos, slabs that are flat, a floor that may be replaced later | Needs a flat surface; can sound hollow without good underlayment |
| Nail or staple | Fastened through the plank into a wood subfloor | Raised foundations, upstairs rooms | Not an option straight onto concrete |
Many Ontario Ranch houses use the first or second method because the floor sits on a concrete slab.
What the numbers show
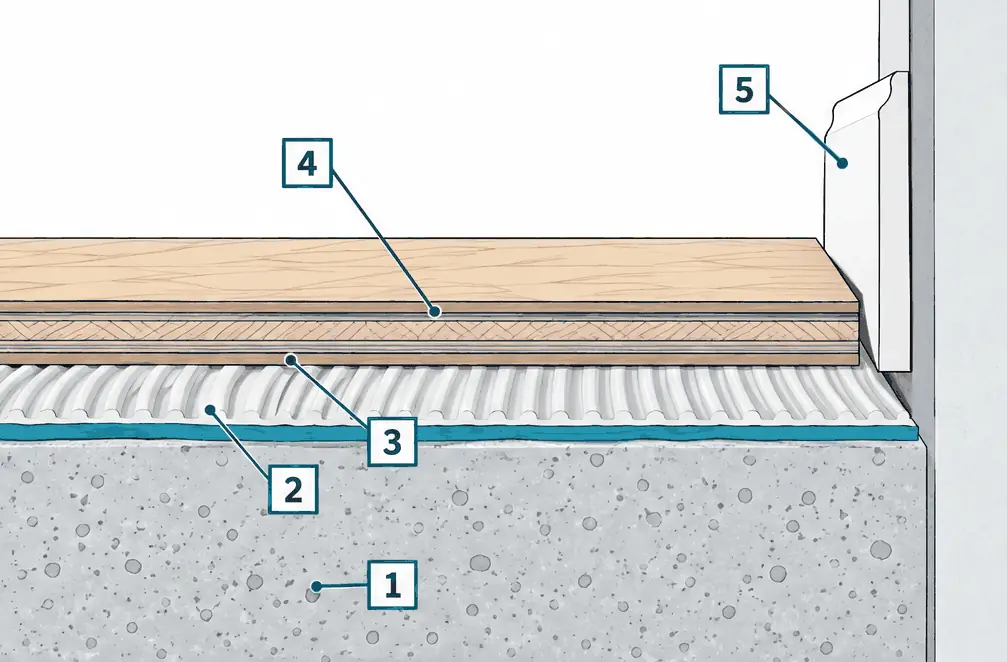
- Concrete slab Tested for moisture first; the flooring maker's written limit decides if glue can go on.
- Moisture barrier A thin coating or membrane used where the reading calls for one, as the maker's instructions state.
- Adhesive Spread with a notched trowel in ridges so the plank bonds across its whole back.
- Engineered plank A wear layer, a layered core and a backer, pressed into the adhesive.
- Baseboard and wall gap A small gap at the wall allows seasonal movement and is covered by the baseboard.
The moisture test comes first
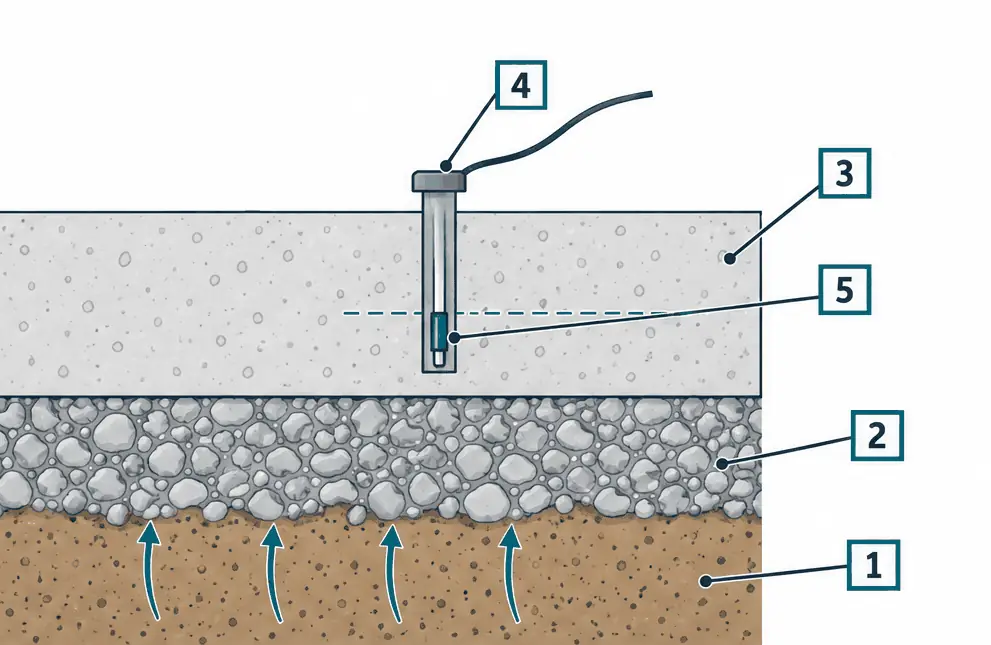
New concrete releases water for months, and an older slab can pull moisture from the ground. Before any glue or underlayment goes down, the slab is tested by a method such as the in-slab relative humidity probe (ASTM F2170) or the calcium chloride test (ASTM F1869). The flooring maker publishes the readings it accepts, and its written limits control; where the reading is high, a moisture barrier is used or the plan changes.
What the numbers show
- Soil The ground beneath the slab; the usual source of moisture.
- Gravel base A compacted layer under the slab, sometimes with a vapor barrier above it.
- Concrete slab Releases water for months after it is poured.
- Probe in a drilled hole A sleeve and a sensor sit in a hole inside the slab, sealed at the top, and read the humidity there.
- Sensor depth For a slab that dries from the top only, the sensor sits at roughly two-fifths of the slab depth, as the test method describes.
What engineered flooring costs in Ontario, CA
Standard prefinished engineered plank runs about $8–$12 per square foot installed on a wood subfloor in 2026. A slab with a glue-down adds about $2–$4, and a floating install about $1–$2.
| Room | Area | Engineered standard on slab, glued | Wide-plank white oak on slab, glued |
|---|---|---|---|
| Living room | about 300 sq ft | $3,000–$4,800 | $4,200–$6,600 |
| Open main floor | about 600 sq ft | $6,000–$9,600 | $8,400–$13,200 |
| Whole single-story home | about 1,000 sq ft | $10,000–$16,000 | $14,000–$22,000 |
A slab moisture test and an acoustic underlayment for a condo are flat lines. These are market estimates, not quotes.
Condo and HOA floors
Many condo associations require an acoustic underlayment that meets a stated sound rating (often given as IIC and STC) and written approval before hard flooring goes in upstairs. The CC&Rs decide, and a lab rating is not a field result. Get the rules in writing before the floor is ordered.
Engineered Hardwood Installation — common questions
Can engineered hardwood go over a concrete slab?
Generally yes, glued or floating, once the slab passes the moisture test and is flat enough for the method. The manufacturer's installation instructions and written moisture limits control.
How many times can engineered hardwood be refinished?
It depends on the wear layer thickness the maker states. A thicker layer can usually take a light sanding more than once; a thin one is better recoated. No number holds for every plank.
Engineered Hardwood Installation: check availability and price range
Bookings aren't open yet — a typical Ontario range in about 30 seconds.